Thursday, May 15, 2014

Metamorphosis Animation


Hey! Haven't blogged in a while... Well recently my class did an animation project, we were supposed to create metamorphosis using different types of animation. We had to at least use two different types of animation! We weren't allowed to use weapons or anything like that, but that is understandable it is school. I got a new team, this time I was working with Brittain again, Erin, and Sydney! Our focus statement was "Rocky becomes hero". We decided that we should take a rock, named Rocky Armstrong, and transform him into a clay figure that would save the day by putting out a building on fire that held people captive. For our types of animation we decided to use, Stykz, claymation, and stop motion animation.

Before we could get started filming, we had to get a rock because a rock is one of the main stars! For our first scene we had Sydney walk into the scene and set down Rocky, all in stop motion. Then we had a paper slide under Rocky, also in stop motion. After that we used stop motion once more to portray clay coming out of Rocky and building over him to turn Rocky into a humanoid figure. Using claymation we made Rocky, now a human like figure, to walk over to this magical portal and fall into it. When Rocky comes out on the other side, he is in Stykz, and that is where he puts out the fire, and the people trapped in the building run out and thank him. We decided also to add credits at the end using whiteboard animation.

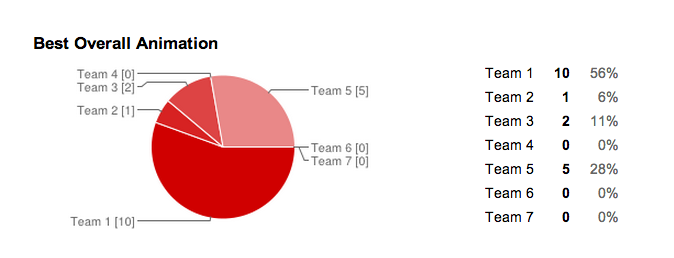
Last Friday we did a critique on all of my classes animations. My team did really well, we actually placed 2nd in the most popular animation! My team is Team 5! Not many people got above and beyonds so I'm happy that some people thought so, we worked so hard. To be honest I didn't think ours was going to be one of the best, I personally liked 1 and 3 three the best, but 1 won so thats good!


Friday, April 4, 2014

Words of Wisdom

Well... Here I am again with another post about the profile project! Oh well!

Unfortunately for my team we did not finish ours on time, but since we had to re-film our video my teacher let us have extra time. We had to stay in for recess, lunch, and even after school. Stella and I couldn't stay after because we had a bus to take, but luckily for us Brittain, who also rides my bus, had drumming so she could stay after. Stella and I didn't get to see the final product, and a lot was riding on Brittain. The total length of it was 3 minutes and 6 seconds. I don't think people liked our video all that much.... I'm just glad that we finished, and I thought it was pretty good.

After we finished re-filming all of our new footage there was 13 new clips, and 20 old clips that we could work with. Stella could't be there for the re-filming so it was just Brittain and I. Everything was going good, but there was one problem... time. This time Mr. Lanphier had to go somewhere, so we only had 30 minutes. We still got everything down!


Thursday, April 3, 2014

Five Tips For....

Earlier this year we had a film project called "Five Tips For....". We got to choose our topic on what we should do, not that isn't any different. We had to film a video displaying five tips on how we can make something better. We were required to use different composition techniques and sequencing. I had a different team for this instead of Stella and Brittain; these team members were Erin and Maya. They are also good friends of mine and I also did my composition techniques assignment. The topic we chose was "Five Tips for Reading a Book". We had chosen this because all three of us have a love for reading.
We had to get together and brainstorm what our tips were going to be. They were...

Tip #1: Pick a book that interests you. Make sure that the description hooks you on, and that you like the genre.

Tip #2: Choose a comfortable and quiet spot. If its too loud when you are trying to read it’s a bit distracting. Also the more comfortable you are then you will shift less and read more.

Tip #3: Try to create mind movies. While reading try to picture what’s happening. It’s more fun and doing this will help you understand what is happening in the book.

Tip #4: Read a good amount. Try to read as much as you can, you don’t HAVE to read too much at one time but if you are really into the book then read on!

Tip #5: MORE BOOKS. If you liked the book you might want to look for more books from the Author or the Genre, maybe both!


Erin was the subject of our video, she was performing all the actions, Maya was editing, and I was filming and doing the narration. We decided to film at Erin's house. We got our project done on time and I personally think we did a good job.


Thursday, March 13, 2014

Practice Profile Story


Hi, this is kind of a repeat to my other post "Practice Story Reflection" but I need to do this, this time with our video. As I said the last time, I was chosen to be interviewed for our Practice Profile. Stella asked the questions and Brittain filmed. We did a great job. This is a little reminder of what I said last time, "Our interview went smoothly, but then a wild B-roll requirement came, and it was time to shoot that B-roll. We shot clips of me reading, or practicing my writing, or researching the college I would like to go to on the the computer. That may have finished, but there was still plenty of work to do; we also needed to finish writing our transcripts and record our narrators voice." Look at more videos at Vimeo.

Monday, March 3, 2014

Profile Project Progress

In G.T my current project is the final draft for the interview a.k.a "Profile Project". My team is still the same, consisting of my two friends Stella and Brittain. We interviewed Brittain's next door neighbor, we chose him because Brittain and I didn't have family on the island and Stella was absent when we selected who we would be interviewing. His name is Mr. Lanphier; we interviewed him on his job, which he is the owner of, so we thought it would be best to film it in his office.

My team and I knew we had to make our B-ROLL interesting, along with it having to flow with the story we were trying to paint. There are some amazing shots of Mr. Lanphier in his element and doing what he does best, but I won't reveal too much. For those of you who don't know, B-ROLL is clips of action that display what the interviewee is talking about. It is also used to cover up narration, and jump cuts in the video. The most important thing that B-ROLL does is keeps the attention of the audience. We also had to film voice over narrations, voice over narration is used to give more insight on what the person whom you are interviewing are talking about. Voice overs also can keep the viewers attention, especially if the interviewee is difficult to understand. We had Stella perform our voice overs because she has a very calm voice, and it would fit in perfectly with our video.

Personally I think my team works great together. I'm good at editing, Stella's voice is perfect for narration, and Brittain is amazing at filming, creating different shots and keeping things interesting. We all live generally close to each other, so getting to a place to film was a piece of cake. We have argued a couple of times, but that is to be expected because we are all stubborn girls. We are really far on our project and I think we can finish on time, maybe even early! To work better together, we could find things for every one to do, so that we are all doing something productive! Generally we are well organized. Maybe if at some points we stopped arguing we could already be done!

Hey! This is an update! Anyways we just had a critique for our final videos. We didn't do so well... But no one got it easy. My teacher told us about all of the flaws. I'm glad that he did because now my friends and I can improve! Along with our teachers critique, we also got responses from the whole class. Many people said we needed more B-Roll and I agree, so we agreed to get more. Some people said we should use real money, that one I didn't like; we were planning on using real money, but no one had any besides a $50 and we needed several dollar bills. We are going to start on our final right away! I think my team and I got this.


Thursday, February 20, 2014

Composition Techniques

There are four main composition techniques. Rule of thirds, framing, unusual angles, and leading lines. These composition techniques make a video 10x better! These are probably one of the most simple composition techniques; leading lines can be found in nature, to do rule of thirds you just need to adjust the camera angle, unusual angles can be preformed by setting the camera low, high, or anything interesting that you can think of, and lastly framing can be done by either hand, or nature. Each definition for these composition techniques, are easy to remember. I would suggest using these four as much as possible when filming, it WILL make a difference

Rule of thirds- When your subject is where lines would intersect if there was a grid on your screen. This composition is always used in interviews.

Framing- Your subject is residing in between something, such as in a clump of trees that open in the center. The center is where your subject should be.

Unusual angles- Unusual angles are used to create change in your video, so the whole video isn't shot from one angle.

Leading lines- These lines can be found in nature, you are supposed to strategically place your subject so that the lines are pointing to them, this helps focus on your subject because the viewers eye will naturally follow the lines, straight to the subject.


Thursday, February 13, 2014

Three Shot Sequences


Sequencing is an arrangement of clips, that displays an action that is happening, using different shot types and angles. For an example, kicking a soccer ball can have a three shot sequence; a ball sitting on the field, then a person running to kick the ball, then a shot of the ball being kicked. Sequencing has four types of shots, Wide, Medium, Close, and Extreme close. A three shot sequence does not always have to be Wide, Medium, Close. It can be Wide, Close, Extreme. A sequence that isn't allowed is Wide, Extreme, Medium because you can't go backwards.

Wide shot- Any view as long as there is no parts cut off of the subject, you can see their feet and the top of their head.
Medium shot- This shot is slightly closer to the subject that the Wide, some parts of the subject can be cut off, but the camera is far enough away so that you can still see most of the subject.
Close shot- The Close shot displays a small part of the subject
Extreme shot- The Extreme shot is of a very small detail on something, whether it is of the subject or the action that the subject is doing.

Friday, February 7, 2014

Practice Story Reflection

Our most recent project in my GT class, is our practice interviews. We made these videos in order to practice for our newest project "Elder Words of Wisdom". The purpose of our project is to interview elders in our community, and ask them to share words of wisdom with us, the youth. So in order for us to make the best interview we could possibly create, we needed practice.

We already got into groups of three for our final interview so we stayed in the same groups for our practice ones. Then we were supposed to select a topic to interview a member of our group about. My teams topic was "Mikela's college plans". My teammates were interviewing me about my plans for college, because I have most of my plans mapped out. They asked me questions about my plans, like which college I would like to go to etc. While I was sitting in the famous interview position, a rule of thirds composition while the interviewee is looking at the interviewer, who is strategically placed out of the camera shot, but also close enough to the camera so the interviewee is looking near the camera.

Our interview went smoothly, but then a wild B-roll requirement came, and it was time to shoot that B-roll. We shot clips of me reading, or practicing my writing, or researching the college I would like to go to on the the computer. That may have finished, but there was still plenty of work to do; we also needed to finish writing our transcripts and record our narrators voice. The next day however was the deadline, AND WE STILL NEEDED TO EDIT! Fortunately for us, we finished editing, and exported our videos a minute before the deadline. Our team was one of the few to make it in on time.

However something else was still on my plate... The class critique. My class had to review each team's video, and naturally I was feeling a bit insecure about the video, especially because I was the one getting interviewed! Another thing that worried me was the new grading scale, it looked like the normal one, but something was off about it. Maybe it was the fact that 3s would be rare, and a three on regular rubrics was a B! I didn't want to get 1s and 2s because I try to get A's and I have never gotten a C or D in my life, and I certainly haven't gotten an F. But in this new rubric 1s and 2s aren't bad. So I didn't panic as much when my team got mostly 2s on our audio and visuals; BUT WE GOT A 3 ON OUR STORY!!!! SUCCESS! The best part was our final grade, we got a 4/4!


Tuesday, January 21, 2014

Polar Panoramas

To create a Polar Panorama, that are like my first one, follow these simple steps!

1. Find a nice spot for your panorama, interesting horizons look the best.

2. To take the pictures for the panorama you take at least 10 pictures rotating 360 degrees.

3. After editing your pictures, you upload them into photoshop and merge your photo’s.

4. Next you need to resize the image to a perfect square, make sure your width is the same as your height.

5. Then rotate your image 180 degrees.

After distort your image with Polar Coordinates and you will have your finished Polar Panorama.

These steps are the same as the Spherical Panorama, but you have to rotate the Image 180 degrees. There are also several new word definitions that we learned.

Composite - Multiple rectangular pieces combined & distorted to become triangular in 1 finished image.
Polar - A circular image that resembles a planet; the horizon line creates a North and South pole.
Spherical - A distorted panorama that becomes a circular image with the earth becoming the outline.
Panorama - 10-15 vertical images taken in a 360 degrees rotation with a central horizon then merged.

As you can see in my second panorama I had to edit my self into the picture. The process was generally easy, and the instructions were easy to follow.
First open your photo in Photoshop, make sure you copy the image so it unlocks.
Then, to start you must access the Quick Selection tool. To find the Quick Selection tool, go to the toolbar and click on the fourth tool down. Select the brush size you want.
To select the parts for your image, you “paint” over them
To clean it up, click on the minus button, and “paint” over the parts you do not want to keep.
When that step is completed, go to refine edge to contract or feather the selection
Copy and Paste the selection onto another layer.

Friday, January 17, 2014

Spherical Panoramas


These are two of my Spherical Panorama's that I created. I particularly like my second picture, I think it looks like a rabbit hole! If you want to create your own little rabbit hole, just kidding it isn't going to look the same. All the while if you would like to make a Spherical Panorama, these are the steps...


  1. Find a nice spot for your panorama, interesting horizons look the best.
  2. To take the pictures for the panorama you take at least 10 pictures rotating 360 degrees.
  3. After editing your pictures, you upload them into photoshop and merge your photo’s.
  4. Next you need to resize the image to a perfect square, make sure your width is the same as your height.
  5. After distort your image with Polar Coordinates and you will have your finished Spherical Panorama.

Thursday, January 16, 2014

Final Photomontages


These are my photomontages... I created them. My inspiration for these were form David Hockney.  I had to take a series of pictures, with each one overlapping another, a bit. Then in photoshop I put them together and got this as my end result.

Friday, January 10, 2014

Magazine Cover

This is my finished project that I created in a class I took. This required a long project that involved talking pictures, working in Adobe Bridge. We also worked in Photoshop. We had to do a contour of ourselves and paint inside of it. We also were required to make up headliners for our cover.